If you are installing enery efficient windows or products to your home, you may be able to take advantage of the following tax credits. Although these credits are not much, any offset in taxes are welcome.
You can get a one-time income tax credit of up to $500 in total for installing efficient new windows, insulation, doors, roofs, and heating and cooling equipment in your home.
Who gets it? Individuals who install specific energy-efficient home improvements.
What energy-efficient home improvements are eligible? The overall $500 cap can be reached in several ways with the purchase and installation of energy-efficient products:
· Exterior windows: 10 percent of the total cost, up to $200. Includes skylights and storm windows.
· Insulation, exterior doors, or pigmented metal roofs: 10 percent of the cost of the product (but not the installation), up to $500. Includes seals to limit air infiltration, such as caulk, weather stripping, and foam sealants, as well as storm doors.
· Central air conditioner, heat pump, or water heater: up to $300 towards the full purchase price, including installation costs.
· Furnace or boiler: up to $150 towards the full purchase price, and/or $50 for an efficient air-circulating fan in a furnace, including installation cost. Section 6.4 of this document contains the detailed criteria for heating and cooling equipment.
In addition, to be eligible for the federal tax credits:
· Windows, doors, and insulation must meet the requirements for your region of the 2001 or 2004 International Energy Conservation Code, a model energy code for buildings. All ENERGY STAR windows qualify.
· Metal roofs must have pigmented coatings that meet ENERGY STAR requirements.
· Heating and cooling equipment must meet stringent efficiency requirements – not even all ENERGY STAR products will qualify. Section 6.4 of this document contains the detailed criteria for heating and cooling equipment.
In addition, windows, doors, insulation, and roofs must be expected to last at least five years (a two-year warranty is sufficient to demonstrate this).
Manufacturers can certify (in packaging or on the company’s web site) which of their products qualify for the tax credit. Retailers, contractors, and manufacturers should be able to help you determine what levels of insulation and what other products qualify.
All the improvements must be installed in or on the taxpayer’s principal residence in the United States. Condo and co-op improvements are apportioned to the owners. The credit cannot be taken against the Alternative Minimum Tax (AMT).
When are they available? The home improvement tax credits apply for improvements “placed in service” from January 1, 2006, through December 31, 2007. They are not available in 2005. The IRS defines “placed in service” as when the products or materials are ready and available for use – this would generally refer to the installation, not the purchase.
What do I need to do to get the tax credit? You will need to file the appropriate IRS form with your taxes. In addition, you will need to keep at least receipts proving that you purchased the improvements and a copy of the manufacturer’s certification (or the ENERGY STAR label for windows). Accountants and tax advisors should also be able to provide more guidance.
· NEW: IRS interim guidance for claiming home energy efficiency tax credits
Visit the association to save energy www.ase.org for more information.
6.4. Criteria for heating and cooling equipment
In order to be eligible for the tax credit, heating and cooling equipment must meet specified measures of energy efficiency:
Central air conditioners must be in the highest efficiency tier set by an organization called the Consortium for Energy Efficiency for 2006 – seasonal energy efficiency ratio (SEER) of at least 15 and an energy efficiency ratio (EER) of at least 12.5 for most air conditioners. This is about 15 percent more efficient than the federal standard that went into effect in January 2006. Individuals can search for qualifying products on the, Consortium for Energy Efficiency’s Web site.
Electric heat pumps must be 15 SEER and 13 EER and must have a heating seasonal performance factor (HSPF) of at least 9.
Geothermal heat pumps must meet current ENERGY STAR criteria – for a closed-loop system, 14.1 EER and a coefficient of performance (COP) of at least 3.3. For an open-loop system, the criteria are 16.2 EER and 3.6 COP. For a direct expansion system, 15 EER and 3.5 COP. In addition the geothermal heat pumps must include a desuperheater, which helps heat water, or an integrated water heating system.
Natural gas, propane, or oil water heaters must have an energy factor (EF) of at least 0.80. This is about 20 percent more efficient than the current federal standard. Only some tankless water heaters currently reach this efficiency level.
Electric heat pump water heaters must have an EF of at least 2.0. This is more than twice as efficient as the current federal standard. There is no credit for other kinds of electric water heaters.
Natural gas, propane, or oil furnaces and boilers must have at least a 95 percent annual fuel utilization efficiency (AFUE) to qualify for the $150 credit. To qualify for the $50 tax credit, the furnace air-circulating fan must use no more than 2 percent of the total annual energy use of the furnace.
Wednesday, August 30, 2006
Tuesday, August 29, 2006
Carpenter Ants
Source: IDPH Website
Carpenter ants are one of the most common household pests in the Midwest. Besides being a nuisance indoors, these ants damage wood by hollowing it out for nesting space. While carpenter ants do not eat wood, large colonies can be destructive; however, are more of a nuisance than a threat to structural integrity.
Carpenter ants are the largest pest ants in the United State. The black carpenter ant (Camponotus pennsylvanicus) is common in the Midwest. The typical adult, known as a “worker” ant, is black, wingless and varies from ¼- to ½-inch in length. The size and color of carpenter ants vary considerably between species and even between ants from the same colony, so these features cannot be relied upon for identification. Instead, look first for the carpenter ant’s smoothly rounded thorax (viewed from the side) and single node (the small triangular connection between the abdomen and thorax; some ants have two nodes).
Carpenter ants are fast moving and stop only to feed or share food with other ants. They are most active at night. Workers emerge from the nest about 15 minutes after sundown. Like other ants, they follow chemical trails in search of food -- sometimes hundreds of feet from the nest – and often create permanent, well-beaten trails like cow paths through the grass. A colony may use the same path from year to year.
A mature carpenter ant colony may contain as many as l0,000 individuals. Typically, only 10 percent to 15 percent of the workers are outside the nest searching for food including insects and a variety of human foods such as meats and sweets. Other workers engage in nest construction and repair, colony defense, and feeding and caring for the larvae, pupae and queen. The workers’ variation in size enables them to specialize for different tasks.
Each year, carpenter ants become active in the spring (March-April) and remain so through early fall (September-October). A mature carpenter ant colony usually releases reproductive individuals in springtime. The reproductives have wings and, like winged termites, are commonly known as “swarmers.” The swarmers’ purpose is to mate and, in the case of females, to fly to a new location, lay eggs and establish a new colony. In winter, most carpenter ant colonies become dormant, although indoor nests may show some continued activity.
Carpenter ant nests consist of smooth, clean tunnels and excavations in wood that run with or against the grain. In contrast, subterranean termite tunnels are lined with a mud-like material and always run in the same direction as the wood’s grain.
A carpenter ant colony is often composed of a series of nests. The main nest, or parent nest, is usually located outdoors, often in woodpiles, logs, stumps, or trees – sometimes several feet above the ground. The nest contains the queen, some workers, larvae and pupae. It may be joined by sub-nests, or satellite nests, containing workers, and older larvae and pupae. The colony’s reproduction takes place in the parent nest where the queen lays eggs. Larvae hatch from the eggs, are cared for and later may be transported to satellite nests. There, the larvae will undergo pupation and complete their metamorphosis to become adult workers.
It is the satellite nest that is most often encountered in structures. A satellite nest is often established in an area where wood has become moist. Common sites include wood around leaking chimney flashing, attics, skylights, bathtubs, windowsills, doorframes, porch supports, columns, soffits, wood siding and shingles, and flat roofs. Carpenter ants also will nest in fiberglass and foam insulation.
For full article and much more information visit http://www.idph.state.il.us/a-zlist.htm.
Sunday, August 27, 2006
Is it a buyers market?
From the perspective of a Home Inspector, it does not feel like a buyers market. Business is slower than last year, but I would expect houses with less deficiencies being sold. This just is not the case. You would think that that sellers would get their houses in better shape to sell. Quite frankly, I am seeing houses with more problems being sold this year than last. Seepage and poor roofs are on the rise. You would think that if more houses are on the market the buyers would pick the houses that look better. What I am seeing is that sellers that have houses with older roofs and minor seepage problems are discounting their price and still getting them sold. Well maintained houses are selling slower but their price is still appreciating.
You can check out what is happening in the Naperville Area market by going to www.pattisdreamhomes.com. Inventories are rising while interest rates and historically low. The job market in the area is still good. This is really a good time to go from renting to owning. When you consider the tax advantages to owning over renting, I cannot figure out why the average renter would not make the transition to ownership.
If you have to move it is important to get noticed and sold quickly. I would recommend a home inspection before you even list the property. Also, using a professional Realtor will improve your chances of selling faster in this competitive market. I am partial to Patti Schiavone for all my Real Estate needs. Property sales with a professional Realtor receive 15% higher sales price than FSBO.
Although sales activity has slowed a little bit, I just do not see a real estate adjustment in this area. Buyers can get a little better of a buy right now but they cannot get well maintained housing for substantially less than market prices.
Thursday, August 24, 2006
Electrical System Problems
It is truly surprising to me when I do a home inspection without any electrical deficiencies. New construction, older homes, it does not seem to matter. I usually find at least one electrical problem in almost all of my home inspections. Following is a list of some of the most popular ones that are found. First is my favorite, the GFCI outlet does not trip when tested. The rest are in no particular order. Double tapped electrical circuits in the electrical panel, improper wire size, improperly sized circuit breakers, improper fuse size, reverse polarity, open grounds just to name a few. Most of the above problems can be avoided. The home owner needs to know what the potential problems may be so they can ask the right questions of installers that do work at their house. If you choose to work on electrical yourself it would be imperative that you had all the proper information. I will go over the above problems and their solutions.
Anyone living in a newer house, less than 20 years old, has probably had an experience with Ground Fault Circuit Interrupter type of outlet. This is the type of outlet that is safer to use around water because it shorts out at very small amounts of current leakage. This outlet compares the amps through the hot wire versus the amps exiting through the neutral wire. A regular outlet does not detect this. You can keep the outlets in good shape by hitting the test button every 3 months. This helps keep the mechanism from fusing. A tester could also be bought in any hardware store for as little as five dollars.
Reverse polarities and open grounds are usually the result of do it yourselfers. Reverse polarity refers to the direction that the electricity is flowing. Simply put the wires are connected backwards. Remember just because it is a simple mistake to correct does not mean that it is not dangerous. In the worse case scenario it is possible for some appliances to have their housings become live in the event of a malfunction. The rule for reverse polarities is black wire attaches to the brass screw while the white wire attaches to the silver screw. Open grounds refers to the fact that any electricity that is lost in the system should flow safely into the ground. This is usually accomplished by adding a grounding wire that is connected to a grounding post or a buried water pipe. Houses built before 1960 generally have no grounded plugs. As people upgrade their houses they generally added grounded plugs. Adding a grounding plug to an ungrounded system does not create a safe outlet. An electrician should be used to install grounding wires. Depending on how the house was originally wired it could be quite complicated and or expensive to correct. When is doubt, use a licensed professional.
Improper sizing are the rest of the problems I encounter on a regular basis. Generally this happens when more than one professional is doing work according to a plan. When an electrician is wiring a new house they are following a wiring guide from blueprints. The guide may call for a dedicated 30 amp circuit breaker for the AC line. Now if the AC unit used calls for a 20 amp maximum circuit breaker, then a mismatch takes place. A simple typo in the wiring guide can happen. The AC installer will probably not check the amp size of the circuit breaker. This is generally how this type of problem persists in new construction. Also, when you replace your old appliances with newer more efficient ones, they may have less power needs. This happens with AC units all the time. An old 3 ton unit would usually need a 35 amp max circuit, while a brand new 3 ton AC unit may only have a 30 amp max circuit. The installer needs to check the electrical needs of new equipment against the actual electrical service in the house.
Double tapped circuits are my next favorite deficiency. It seems that everyone breaks this rule. I often get calls from sellers saying they had an electrician to the work in their house so the double tapped circuit should be ok. This is just not the case. A circuit is meant to protect from over current from one branch wire that is capable of a certain amp load. For instance a wire that is capable of safely carrying 20 amps will be connected to a 20 amp circuit breaker or fuse. In the event there is an over current the breaker will shut off. When two such wires are connected you run the risk of supplying so much electricity that the breaker of fuse cannot react and an electrical fire is the result. It really happens but it can. This may be the reason this rule is broken with such regularity.
Lastly, for all those homeowners that are using fuses. I often find 30 amp fuses screwed into a 20 amp slot. I understand how this happens. If you do not have the proper fuse on hand please go to the hardware store and buy the proper size. As above an electrical fire can start.
For the above reasons I recommend that a homeowner has their electrical system checked after renovations and new added appliances. It is better to fix problems as they occur then to wait until you sell your house. I would also recommend a complete home inspection every five years as you may become comfortable with safety problems around your house.
Sunday, August 20, 2006
The Consequences of Bad Ventilation
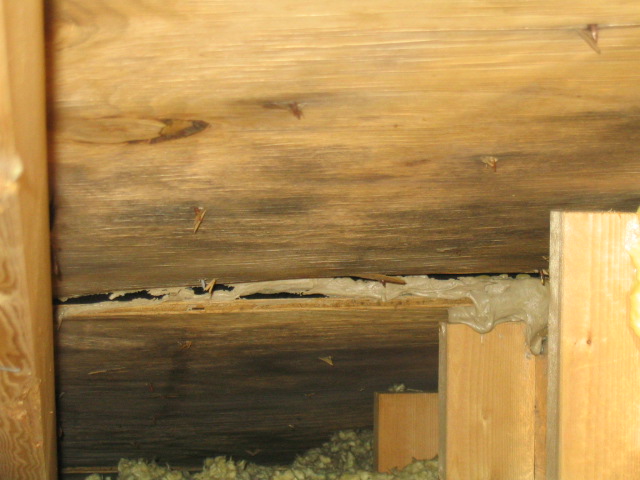
The concept of proper ventilation is a key concept in attics and crawlspaces. The fact of the matter is that water vapor needs an escape from the area. When water vapor is not allowed to leave an attic or crawl, a true recipe for disaster is created. Care should be taken when improvements are made. I have come across many older homes with retrofitted ceiling fans in the bathrooms. This is a great feature to get excess moisture vapor out of the bathroom. All too often, the fan is allowed to terminate in the attic space creating a moisture problem in the attic space. Below is an example of just such an installation. The proper installation would have the fan exhaust all the way out of the attic and through the roof.


1 Bathroom fan that terminates in the attic
Another example of an improvement going bad is when extra insulation is added to the attic. Care must be taken that the extra insulation added will not interfere with the ventilation of the attic. One way to ensure that the vents will not be covered is through the installation of baffles that will allow air flow down to the soffit vents. Below is an example of adding insulation without allowing for ventilation.

2 blocked vents with insulation
The results of such an installation are as follows: condensation problems, overheating attic, and crating a condition that will allow mold and mildew growth. Mold and mildew can be used by some buyers to scare sellers into expensive concessions during the selling process. Below is the result of not allowing proper attic ventilation.
3 wood damage and warping with obvious growth
Here a simple thing like no ventilation had caused the wood decking material to warp and separate. Trying to seal the area is only a stop gap approach to fixing the problem. The ventilation needs to be restored and only then can the wood decking be addressed. The other problem that this improper ventilation has caused can be seen from the roof.

4 Visible ripples noted
The warped decking has created a visible ripple on the roof shingles. Also, excessive wear has been caused by all the underlying problems. It is important to check with professionals when doing home projects yourself. Also, just because you have paid someone money to do work at your house, this does not make them professionals.
Thursday, August 17, 2006
Get a home consultation before you list your home.
If you need to sell your house in today’s market you will need to stand out. There are too few buyers vs. sellers. The inventory of homes is its largest in the last few years. You are going to need to know all the problems that your house may potentially have. A quality home inspection will give you the information you will need to successfully place your house on the market and sell it profitably. Also, an inspector can give you insight into what the buyer’s home inspector will be looking for. Keep in mind that interest rates are still at a 20 year low and smart buyers are out there. Getting a home inspection before the listing will give you an opportunity to see where you will spend your money to market your home.
As I have said before, the potential home buyer will have ideas about the house from the time they are walking in the front door. So take a critical look at your house from the street. Ask yourself the question, would I buy this house? This is were you need to be objective, if the roof does not look flat with little to no deterioration on the shingles, most buyers will be reticent to look past this. You may want to get a professional roofer to certify the roof. The roof may be in fine shape and you have never had a problem, but most buyers tend to be skeptical about what the seller will tell them about the house. I have found that most home sellers have a really hard time being objective. The home inspection will tell you in advance where the pitfalls may be.
It is important to be with the inspector when he inspects your house. A good inspector can share with you what he is looking at and why. Issues that you never have thought of may be of concern. You may be quite comfortable with the carpet that is not tacked down correctly at the living room entrance, but a buyer may see that as a tripping hazard. Another common problem that seems to bother buyers is when the hot and cold faucets in a sink are reversed. The home inspection report will let you know which simple fix ups to tackle.
Another important aspect of the home inspection will be the major systems checks. If you bought your house 10 years ago, all the major systems have aged 10 years also. The manufacturers of hot water heaters will tell you that the life expectancy of a hot water heater is around 8 to 12 years. Therefore the buyer may perceive a 10 year old hot water heater as being older and may need to be replaced soon. It is not practical to replace all aging systems in the house; therefore you may want to talk to your Real Estate Agent for strategies that will make the house more sellable in this market. A good home inspection will help you and your Realtor with the needed information for action marketing.
Placing your house on the market and waiting for a buyer is just not good enough is today’s competitive Real Estate Market. It is important to be proactive. Anticipating and dealing with potential problems before the crunch of an offer gives the seller more options of successfully completing the deal in a profitable way. A home inspection gives you the opportunity to discuss how you will deal with potential deal breakers.
The home inspection is becoming more important than ever. It will give you a guide as to where to spend your limited budget to sell the house. It will also remind you of the minor fix ups that are virtually no cost. The inspection will also help your Realtor be more proactive with the marketing of your home. Lastly, the home inspection will let you know about potential deal breakers that may come up once you have a deal. Remember to Call NCS Inspections for your home inspection today.
Vapor Retarders
For more information from the North American Insulation Manufacturing Association: http://www.naima.org/
Vapor Retarders:
A vapor retarder (barrier) is defined by ASTM C 755 as a material that has a water vapor permeance (perm) rating of one (1) or less. The terms vapor retarder and vapor barrier are used interchangeably and describe the same materials. For consistency, the term retarder will be used here.
What Does A Vapor Retarder Do?:
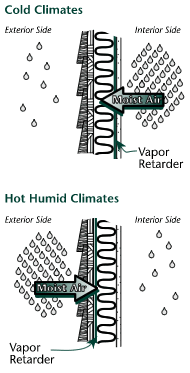
Occupants of buildings, appliances, and plumbing equipment generate moisture that is carried in the air as a vapor. As moisture vapor moves from a warmer interior through construction materials to a cooler surface, the moisture may condense as water, which may damage the building. It is for this reason that vapor retarders, which retard the flow of moisture through construction materials, are installed in buildings. By locating vapor retarders as close as possible to the warm-in-winter (heated interior) surface of the building, the moisture vapor flow is restricted before it has a chance to condense to water.
Vapor Retarders:
A vapor retarder (barrier) is defined by ASTM C 755 as a material that has a water vapor permeance (perm) rating of one (1) or less. The terms vapor retarder and vapor barrier are used interchangeably and describe the same materials. For consistency, the term retarder will be used here.
What Does A Vapor Retarder Do?:
Occupants of buildings, appliances, and plumbing equipment generate moisture that is carried in the air as a vapor. As moisture vapor moves from a warmer interior through construction materials to a cooler surface, the moisture may condense as water, which may damage the building. It is for this reason that vapor retarders, which retard the flow of moisture through construction materials, are installed in buildings. By locating vapor retarders as close as possible to the warm-in-winter (heated interior) surface of the building, the moisture vapor flow is restricted before it has a chance to condense to water.
Vapor Retarder-Faced Insulations:
The vapor retarder facing should be installed toward the warm-in-winter side of the construction except where noted. This means that in ceilings the vapor retarder faces down, in walls it faces the inside, and in floors over unheated spaces it faces up. With the exception of reverse-flange insulation, the stapling flanges are on the same side as the vapor retarder. In warm, humid climates local practice should be followed regarding the use of and/or placement of vapor retarders.
Note: The ASHRAE Handbook of Fundamentals, Chapter 23, Thermal and Moisture Control in Insulated Assembly Application, contains information on the placement and use of vapor retarders in various climates including humid climates such as Florida, the Gulf Coast, or Hawaii.
When Is A Vapor Retarder Required?
Good construction practice calls for installing vapor retarders in walls of all new buildings. Local building codes should be followed with regard to the need for vapor retarders in ceilings. When it is convenient to do so, vapor retarders should be installed in existing buildings. In some cases local building codes may conflict with common building practices regarding the use of vapor retarders. Always confer with local building departments before beginning construction.
Cautions!
Always follow these rules when working with vapor retarder-faced insulation:
Many facings are flammable. Because of this, when vapor retarders face building spaces intended for human use, they must be covered. These spaces include garages, storage rooms, utility rooms and laundries. NAIMA recommends that this statement be printed on all combustible facings:
"This vapor retarder is flammable and should not be left exposed. Special care should be taken when working close to the facing with an open flame."
(For exposed applications, insulations with special, strong, reinforced flame resistant facings are available.)
Batt and blanket insulations may be installed one on top of the other in ceilings where there is adequate space. Only the bottom layer should have a vapor retarder, which should face down toward the space that is warm-in-winter. Additional layers should be unfaced. If unfaced insulation is not available, use the faced type but remove the facing completely before installation.
Repair damaged vapor retarders. Rips or tears in the vapor retarder facing may be repaired by covering the damaged area with scrap vapor retarder material and taping it in place or, in the case of small rips, by using duct tape or polyvinyl tape. Gaps around windows, doors and other openings should be covered with vapor retarder facing or taped.
Avoid electrical wiring when stapling vapor retarders or facings. Care should be taken not to staple into electrical wiring when installing faced batts and blankets or separate vapor retarders.
Other Vapor Retarder Materials:
The use of separate vapor retarders with unfaced insulation is becoming more common. They should face the warm-in-winter side of the framing. Four-mil, or thicker, polyethylene sheeting, available in rolls, is rolled out horizontally and stapled to the face of the framing, at top, bottom and the side. If one sheet of poly is not wide enough to cover the area and a second sheet of polyethylene is required, they should be overlapped on the stud space where they meet and stapled to adjoining studs.
Foil-backed gypsum board is also an effective vapor retarder. Other options for providing a vapor retarder include gypsum board manufactured with a vapor retarder or vapor retarder type paint, which may be used in renovations.

Wednesday, August 16, 2006
Floors and Structure
There are two different questions that I usually get during a home inspection regarding floors. The first question, why are the floors squeaky. The second question is how come I notice a slight bounce in the floor when I walk on it. Both questions are asked by the buyer because of fear of structural problems. Usually neither of these situations is due to structural problems associated with the construction of the house. In fact, building codes do allow for floor deflection and some bounce in the floor. The question then becomes to what degree the floors are deflecting. I will start by discussing squeaky floors first and then finish with the question of floor deflection.
If you are noticing squeaky floors in your home or a home that you are going to purchase the good news is that squeaky floors are not a structural problem. A floor usually squeaks when the flooring finish or sub-floor is not tightly attached to the joists below. The sub-floor must be securely tightened to the joists and the floor finish must be adhered tightly to the sub-floor. When the flooring is not tightly secured, it sits just off the support in some spots. When someone steps on the flooring in this area, it is pushed down onto its support. When the foot is taken off the floor, it springs back up. This rubbing of flooring components and it fasteners causes the squeak. Solving the squeaky floor problem may take some investigation. The squeak depends on the floor finish, the sub-flooring used, and type of fasteners used. For instance a hard wood floor may squeak due to nails sliding up and down while a carpeted floor may squeak due to poor sub-floor attachment. If the noise is isolated and not excessive most home owners will usually wait until they change floors to fix the condition. If the squeaking is excessive you may need a professional to further examine and take apart the floor to get at the root cause. Remember, the solutions may be different based on your final goal. If you have an old house and want to keep the truly amazing older wood floor, then your solution will be different than a client who has an outdated floor that he was looking to change anyway.
The deflection of a floor and joist system in modern construction may be quite surprising. Many codes allow a floor to deflect 1/360th of its length under normal live loading. This equates to a ½ inch floor drop for a span of 15 feet. A ½ inch drop over the distance of 7 ½ feet is certainly noticeable. The above holds true for live loading, which is the weight of the people and furniture in the structure, therefore the same structure without any furniture will not have a noticeable deflection until you furnish the house. While this is permitted by many building codes, it may not be satisfactory for you. Building codes are intended to be minimum standards. For this reason many home builders will go above and beyond the building codes. For instance, a very brittle floor finishing material, such as ceramic tile, would not tolerate a flex as above. More rigid floor structures are required where the flooring is brittle. Furthermore, making the sub-floor more rigid by adding cement or additional sub-flooring will create an additional load on the joists which must be considered.
The bouncy floor may be fixed in a number of ways. It really depends on the access that you have to the floor underneath. You may be able to make a floor more rigid by adding cross bracing or screwing plywood to the bottom of the joists. Also, adding a support beam will also solve the problem. Of course the solutions depend on the amount of deflection you have and the budget you are working with. If you are living in the house over the long term you may want to consider an option that will allow you other flooring options down the road. As always, seek the advice of professionals before you start your project.
Tuesday, August 15, 2006
Crawl Space Ventilation Recommendations
Information from NAIMA. More Information can be found at http://www.naima.org.
The Building Foundation Design Handbook (Labs et al. 1988) notes that ground cover membranes such as 6-mil (0.006 in.) polyethylene that restrict evaporation of soil moisture are the single most important way to prevent condensation and wood decay problems in crawl spaces. The ground cover material should have a perm rating of no more than 1.0 and must be rugged enough to withstand foot and knee traffic.
All debris must be removed and the soil should be leveled before laying the membrane. Overlap edges 4 to 6 in., and continue the membrane up the face of the wall to the grade level if the interior grade is below the outside grade.
Traditional building practices and building codes have included provisions for crawl space ventilation. In recent years, some researchers are finding that crawl space vents may not be necessary, especially in southern climates where vents can introduce hot, humid air into the crawl space. As more information becomes available, building codes may change their ventilation requirements. The following vent area recommendations reflect the current prevalent building code requirements.
A rectangular crawl space requires a minimum of two vents, located no farther than 3 ft. From corners. The vents should be as high on the wall as possible to best capture breezes, and landscaping should be planned to prevent obstruction of the vents. The total free (open) area of all vents should be at least 1/1500 of the floor area. In the absence of a ground cover, the vent area should be increased to 1/150 of the floor area. Ventilation alone should not be relied upon where soils are known to be moist.
Steps to Determine Crawl Space Ventilation Needs:
1. Measure square footage to be ventilated. 2. If ground cover vapor retarder is not used, divide the square footage by 150 to determine needed vent space. Then consult the obstructions chart and multiply venting by the number given for the type of material used.
If ground cover vapor retarder is used, vented area may be reduced to 1/1500 of the floor area.
3. Determine location of needed vents. (See Below)

Do Your Homework before You Hire a Home Inspector
You finally did it. You put an offer on the one home you would like to purchase. The next 5 business days are going to be hectic. You have do decide on the inspections that you are going to get and then you need to find someone to do the inspections. Who do you use to inspect the single biggest purchase of your life? You may ask your realtor or lawyer for some referrals. But in the end you must choose an inspector that you are comfortable with. Here are some important questions to ask your inspector. First, what are you going to inspect. Not all inspectors inspect all the same areas of a house. For instance some inspectors do not run appliances. This seems peculiar to me since at least 20% of all deficiencies are noted in appliances during the home inspection. The home inspector cannot tell you how well a dishwasher will clean dishes but at least you know that it went through a cycle and did not leak when ran. Second, what kind of equipment is does the inspector use. Some use pen and paper with a flashlight. Others use infra-red cameras to detect problems. Third, what kind of tests does the home inspector take care recommend? Some inspectors will add on test after test until you spend all the money in your wallet. I believe in the basic home inspection along with a radon test. I can tell my client during the inspection if a mold test, water test, or WDI inspection is needed. Finally, I believe in asking what type of report is going to be delivered and in what time frame. This is very important as lawyers will use this report when larger problems are noted. I tend to like a more narrative report. Sure they take a lot longer to write but at least the client and the lawyers will know what the problems really are. I have seen check off reports that say satisfactory, good, and poor. What do you ask for if the roof is in poor condition? Do you need an entire new roof or just does it need repairs.
Lastly, if you have a house over a million dollars you may want to hire two inspection companies and compare the reports that you get. Remember, inspectors come from different backgrounds and are generalists in a lot of fields. Two inspectors may have different ideas about the same problem All good inspectors will give you an honest opinion, but they should also not be afraid to tell you when they do not know the answer to a question. There are times when I need to research an item that I have inspected to give my client the best answer possible. There will be times during the inspection that the inspector will tell you to have a licensed professional of a field come to further evaluate and remedy an certain item.
Your home is important. You should spend the $425.00 to $625.00 to find out as much as you can about your new purchase. This would cover the cost of a Home Inspection and a Radon Test. This is why you need the expertise of a professional inspector who would tell you if other tests are needed.
Friday, August 11, 2006
AC without Ducts
If you live in a old house without duct work, then you know the limited options you have with regards to putting in an Air Conditioning System. Ductless split-system air-conditioners are relatively new to North America, although the Japanese manufactured and used them in their country for many years.
Ductless split-system air-conditioners combine the zoning flexibility of a conventional room unit (a single air-conditioner installed through a wall or a window frame) with the whole-house cooling potential of central systems. Like central systems, they have two main components: a compressor/condenser, as well as an air handling unit, which contains an evaporator and a fan. Some units operate as heat pumps and provide both summer cooling and winter heating.
The noisy compressor and condenser are housed as one unit and located outdoors. The quiet fan/evaporator unit is indoors, located in the area to be cooled. A conduit, which houses the power cable, refrigerant tubing, suction tubing, and condensate drain, links the outdoor and indoor units.
Advantages:
The advantages of ductless split-systems over room and central air-conditioners are: easy installation, quiet operation, versatility in zoning and design, and security. The split systems also eliminate the loss of cool air as it passes through the ductwork
Ductless split-system air-conditioners operate relatively quietly, since the compressor is outside and the evaporator unit's fan generally runs at a low speed. Variable speed high efficiency fans are also available.
When it comes to efficiency you have two advantages. Areas of the house that are not in use can be turned down to save money. Also, the system does not loose its cool air through the duct. Ducts moving through a uncontrolled area, such as an attic, can loose up to 30% of its cooling capacity. If you cannot afford to purchase an air conditioner for the whole house, you can also buy the system one zone at a time. A single outdoor unit controls from one to four zones, depending on the size of the unit.
When compared to other add-on systems, split-systems also provide better interior design options. The air handlers can be suspended from a ceiling, mounted flush into a drop ceiling, or hung on a wall. Floor-standing models are also widely available. Most indoor units are low-profile models, no more than seven inches (17.78 centimeters) deep, and come with decorative jackets. Most newer models come with a remote control unit as standard equipment. This allows the positioning of air-handling units high on a wall or suspended from a ceiling, without compromising convenience.
Unsecured room air-conditioners provide an easy entrance for intruders. Split- systems are more secure than window units since there is only a small hole in the wall.
Disadvantages:
The primary disadvantage of split-system units is their cost. Split-system air- conditioners cost about $1,500-$2,000 per ton (12,000 Btu/h) of cooling capacity. This is about 30% more than central systems, and may cost twice as much as window units of similar capacity.
The installer must judge the best location for the air handling unit. It also needs to be the correct size for the area it cools. The air handler blows air up to 30 or 40 feet. If the system is improperly positioned and/or sized, the air can bounce off a wall or another obstruction. This results in short-cycling, which wastes energy and does not provide the desired temperature control. An oversized unit also costs more than a correctly sized unit.
Some people may also not like the appearance of the air handling unit. While less obtrusive than a window unit, they seldom have the built-in look of a central system. There must also be drainage for condensate outside the building. If the drainage is not well placed, the condensate can stain concrete or building materials.
Thursday, August 10, 2006
Attic Ventilation
The following information is from the North American Insulation Manufacturers Association:
Moisture accumulation within a building structure can cause problems such as water stains, ice damage, peeling paint, wood deterioration, mold and mildew. Water forms when water vapor migrates through the structure and condenses on a cool surface. There are three basic ways to minimize potential water vapor condensation problems in attics, floors and walls:
- Provide sufficient ventilation to reduce excessive water vapor build-up within the home;
- Ventilate building sections so that excessive water vapor is dissipated to the outdoor air;
- Use vapor retarders to limit water vapor transmission into building cavities.
Ventilation and circulation with outdoor air are the major moisture control strategies for attics and crawl spaces. In most parts of the country, passive ventilation is important for attics and crawl spaces, and mechanical ventilation is desirable for kitchens, laundries and baths. All of these strategies are designed to remove water vapor from the structure so that condensation will not occur. Vapor retarders limit the migration of water vapors from warmer areas to the cold surfaces in walls, roof/ceilings and sometimes areas below floors. Vapor retarders reduce the amount of water vapor available for condensation.
Attic Ventilation
NAIMA recommends the following widely used ventilation strategies:
- Provide ventilation for each separate space to the outside with ventilating openings protected against the entry of rain and snow.
- The total net free ventilating area shall be no less than 1/150 of the attic floor area if no vapor retarders are used, or 1/300 of the attic floor area when a vapor retarder having a permeance of one perm or less is used.
Steps to Determine Attic Ventilation Needs
Measure area to be vented.
- Divide this number by either 150 (no vapor retarder) or by 300 (vapor retarder in place).
- Multiply by the appropriate factor from Table 1
- learn the total gross vent area needed.
Determine where vents will be located. (See examples in Figure 1.)
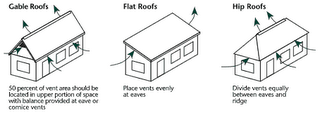
Cathedral, flat and hip roof/ceilings with vapor retarders need a vent area of 1 sq. ft./300 sq. ft. of ceiling. Total ventilation may be achieved by placing half of the required vent area at each eave. Without a vapor retarder, the vent area should be doubled.
The most effective ventilation is provided by a combination placement of the vents with 50 percent of the area at the roof peak and 50 percent at the soffits or eaves.
Table 1- Obstruction Chart
TYPE OF COVERING AREA OF OPENING
1/4" hardware cloth 1 times required net free area
1/4" hardware cloth and rain louvers 2 times required net free area
1/8" mesh screen 1.25 times required net free area
1/8" mesh screen and rain louvers 2.25 times required net free area
1/16" mesh screen 2 times required net free area
1/16" mesh screen and rain louvers 3 times required net free area
Caution should always be exercised to assure that ventilators are not obstructed. Blocking or baffles should be used at the eaves to keep insulation material away from soffit vents and provide a 1" free airspace.
Net Free Vent Area:
The stated vent areas for attics, roof/ceilings, and crawl spaces refer to net free areas through which air can pass unobstructed. When screening, louvers, or rain/snow shields cover vents, the area of vent openings should be increased to offset the area of the obstruction. Use manufacturers' stated net free areas whenever available. If no information is available, use the conversion factors for determining gross area of vent openings listed in Table 1. Caution should always be exercised to assure that ventilators are not obstructed. Blocking or baffles should be used at the eaves to keep insulation material away from soffit vents. Recommendations for air space between the roof sheathing and the insulation may vary. As a general rule of thumb 1" is often used. (See Figure 2.)

More Information can be found at http://www.naima.org.
Wednesday, August 09, 2006
BAMBOO BASICS
As a flooring product, the benefits of bamboo are unbelievable. Given its hardness, durability, beauty, and environmental friendliness, bamboo is a simple, common-sense alternative in a complicated world.
Strength and Durability:
When you think about a thin bamboo cane, it might seem almost flimsy. In comparison to Red Oak, the most commonly installed wood flooring; it is 25% harder and just as strong. Bamboo is even harder than Rock Maple, making it an incredible durable, impact-resistant form of flooring. Better yet, it expands and contracts 50% less than other hardwoods. As a result, bamboo can be used in homes and climates where a high humidity or temperature variation makes hardwoods impractical.
Colors:
There are two main colors of bamboo flooring to choose from. First is its natural blonde hue, which reflects bamboo’s true color, along with its beautiful grain, growth patterns and joints. Bamboo is also available in darker, amber tones that are achieved through a smoking process. When bamboo is smoked, the carbonized grains take on a darker, caramel or amber tone throughout.
Environmentally speaking:
Bamboo is probably the most environmentally sound flooring available, offering a responsible, sound alternative to hardwoods. While offering the beauty, strength characteristics and hardness of hardwoods, bamboo is technically a grass that can be harvested in about five years. Recognized as the fastest-growing plant on earth, bamboo offers 25 times the yield of hardwood, yet is much more sustainable and renewable. It can be harvested and replenished with virtually no impact to the environment. Harvesting does not kill the plant, because it constantly regenerates itself by sending out runners that result in new canes. Bamboo can be grown in soil damaged by overgrazing and poor agricultural techniques, and topsoil is not damaged when the cane is harvested. Not only does the topsoil stay in place, the plant’s dense leaf cover actually improves the soil over time. While protecting the environment and reducing the demand for over-harvested hardwoods, bamboo offers strong, durable, beautiful flooring that can accentuate any home or business.
Tuesday, August 08, 2006
When should I use pesticides to control pests?
When it comes to pesticides used in the house. I would recommend that a homeowner only use pesticides as a last resort. When it comes to pests the best action is education. In general pests enter your house from the outside. Most insects will come from the exterior of the building. If you have mice in the house they came from the outside. Therefore your best pest control is usually achieved through good construction practices and weather-proofing. Walk around the outside of your house and look for areas where pests can enter. It may seem that those little buggers can get into the house anywhere. The important thing is to start your own inspection of your house. Start with the bigger problems and move your way to the little ones.
Let’s focus on mice for the sake of this discussion. Start with your vegetation. If you have a lot of creeping ground cover you are providing lots of harborage for mice. Just by removing the ground cover and planting vase shaped shrubs you can significantly cut down on the amount of rodents that may be around the outside of your house. Second look at where you store your garbage. Do your garbage cans have tight fitting lids? If they do not you should not store your garbage outside. Next, look at anything that may be up against the house. You should not store wood piles up against the house. This is just an invitation to nest next to the house. A house mouse will try to set a nest within ten feet of food and water if they can. A wood pile next to the back door, which probably is close to a hose bib, is just asking for trouble. A mouse next to a water source and the back door that opens on a routine basis means mice will be in the house. Look at your doors, if you see a gap at the bottom of the door it is time to weather strip the door. Not only will you keep out pests you will save energy. Finally as you walk around the house look at any areas where service lines enter the house, all too often a gas line or AC line enters the house with the hole in the house much bigger than the service line. This gap can be large enough for mice to enter. A mouse can enter an area that is very small. If you can fit a pencil or pen through a hole in the house a mouse can enter. The same thinking can apply to insects. Small gaps between elements of construction should be sealed with a high quality sealant. If you can keep out water and wind you will keep out pests.
Now when do I decide to use a pesticide? I tend to hardly ever use any type of pesticide in my own home. When pests are noticed around the house I always start with pest monitors. A pest monitor is a fancy word for a glue board. You can learn a lot with hidden placements of glue boards can tell you where more pests will be found. You can then target your use of pesticides around your home. If you are having ants invade from under a baseboard, you can treat that area with a pesticide and later seal the baseboard. Remember, if you are having a large scale pest problem in the house there probably is a structural, or sanitation problem to be corrected. If you want to apply pesticides around the house if is still better to apply them around the exterior of the house. As always when using a pesticide read the entire label before you use it.
Of course, there are pests that do not come in from the outside. Generally stored product pests, and German roaches are usually carried in to the house from other locations. Proper sanitation is the keys to getting rid of these types of pests. If you come across pests that you cannot identify, it would be a good idea to get professionals in that can identify the pest. If you have professional pest control operators come to your house they should be able to identify the pests before they apply a pesticide. Questions about pesticides used by professionals can be answered with the label and Material Safety Data Sheets. Your pest professional can supply you with copies. Also, if you use professionals they should give directions for structural and or sanitation corrections that will help solve the problem more quickly.
The decision to use pesticides is a matter of personal choice. Read and understand the label of any pesticide that is going to be used. The type of pests and application sites should be on the label. Do not apply any pesticide if you feel it is not safe, even if it is a stated application on the label. The label is the law but you still need to use common sense when applying pesticides. Finally, if you have made reasonable attempts to control pests in your house and the problem persists, it may be time to call a pest control professional.
Monday, August 07, 2006
The Final Walk-Through Inspection
All home buyers should plan to make a final walk - through inspection of their new homes prior to closing in order to make sure the condition of the property is the same as it was on the day you signed your purchase contract. You should take an early walk through to check repairs agreed to by the seller, but this early inspection does not replace your final walk-through on closing day. Your home inspector can re-inspect these repairs for you.
Always do your final walk – through after the sellers have moved, but prior to closing. At this point you are not inspecting for repairs– you simply want to make sure that the home is in the same condition it was when you signed the contract to purchase it. Check to make sure that the appliances that were in the house are the same or better than the ones that were there when the offer was made. That old refrigerator in the garage may be moved to the kitchen and the new refrigerator is taken.
. A few things to check for:
· Have items been damaged during the move? Inspect floors for rips or gouges. Look at the walls, especially around door frames that large furniture and appliances might have been moved through.
· Most offers to purchase include wording that states all major systems in the home must be in working order at the time of closing, so it is fine to do a quick test of appliances and other items such as the furnace and air conditioning. Those items should have been checked during the home inspection, but there is always a chance that they have quit working since that date.
· Make sure that all items that the seller agreed to leave are still there.
· Make sure all items the sellers agreed to remove have been removed.
If the condition of the home has changed since your offer to purchase it, you are in a better position to get the problems handled when you bring them to everyone’s attention before the deed changes hands.
If necessary, repair or replacement funds can be negotiated, deposited into an escrow account, then drawn on to bring the home back to the shape it was in on your contract date.
An alternative is to negotiate a flat amount to be paid to you at closing. Or, if damage is excessive, you might prefer to delay closing until repairs are made.
The final walk- through is not the time to do a home inspection. It’s simply an opportunity to make sure that the home being conveyed to you is the home you agreed to buy.
Mold Facts and Homeowners Insurance
These are some interesting excerpts from: The Illinois department of Insurance
http://www.idfpr.com/DOI/HomeInsurance/mold.asp.
Can mold become a problem in my home?
Yes. Molds will grow where conditions allow. Molds require two things to grow -- a food source and moisture. Food sources can be anything from dry wall and insulation to carpeting or mattresses. Moisture can come from many sources, including high humidity levels, leaky pipes or appliance hoses, neglected or inadequately repaired roofs, improperly maintained air conditioners, landscape and drainage problems, etc.
Are molds a health concern?
According to the Centers for Disease Control, exposure to mold does not necessarily result in a health problem. Molds have existed for thousands of years and there are over 100,000 kinds of mold. Most people touch, eat, or breathe some mold every day without ill effects. There is even mold in fresh air.
If mold growth is active, extensive, and persistent, it has the potential to cause health problems, the most common of which are allergic reactions such as wheezing, sneezing, coughing, eye irritation, etc.
While many people seldom experience ill effects from mold exposure, some individuals are more sensitive to molds than others. The same amount of mold may cause health problems in one person, but not in another. The Illinois Department of Public Health identifies those who may be at greater risk for more severe symptoms or illness as individuals with existing respiratory conditions such as allergies, asthma, or chemical sensitivities; individuals with weakened immune systems; infants and young children; and the elderly.
Do homeowner's insurance policies cover mold damage?
It depends on what caused the mold and the policy coverage you have. Molds need water or moisture to grow, but not all causes of water damage are covered by homeowner's insurance policies.
For example, standard homeowner's policies do not cover water damage caused by "maintenance" problems, such as continuous or repeated water seepage or leakage, humidity or condensation problems, or landscaping or drainage problems. Homeowner's policies also exclude water damage caused by floods. Therefore, if one of these water or moisture problems results in mold, it would probably not be covered by your policy.
Standard homeowner's policies do cover some types of sudden and accidental water losses, including burst pipes, and sometimes sewer back up or sump pump failure if you have that coverage. However, even if your policy covers these types of water damage, some companies have begun to specifically exclude or limit coverage for mold that results.In Illinois, if mold results from water damage following a covered fire or lightning loss, the mold damage would be covered, and the total of all damages, including
Should I have my home tested for mold?
Testing for mold is difficult, time-consuming, and expensive. The Illinois Department of Public Health does not currently recommend mold testing since there are no standards about how much mold is acceptable, and testing cannot determine which, if any, health problems will occur.
In most cases, if you can see mold, don't waste the time or money testing it. Instead, fix the source of the moisture problem, and clean up the mold.
Where can I get more information about mold and its health effects or clean up?
Illinois Department of Public Health(217) 782- 5830
www.idph.state.il.us/envhealth/pdf/moldmildew.pdf
www.idph.state.il.us/envhealth/factsheets/moisture.htm
www.idph.state.il.us/envhealth/factsheets/stachybotrys.htm
How to Buy an Energy- Efficient Home Appliance
You go shopping for a new refrigerator, and you’re on a budget. The best buy is the ‘fridge with the lowest sales price, right? Not necessarily, If you buy the lowest-priced refrigerator, you may end up spending more than if you buy a more expensive one. The reason? The cost of owning a home appliance has three components; the initial purchase price, the cost of repairs and maintenance, and the cost to operate it.
To figure how much you’ll spend over the lifetime of the appliance, you have to look at all these costs. The appliance with the lowest initial purchase price, or even the one with the best repair record, isn’t necessarily the one that costs the least to operate.
You can learn about the energy efficiency of an appliance that you’re thinking about buying through the yellow-and-black energy guide label it displays. The FTC’s Appliance Labeling Rule requires appliance manufacturers to put these labels on: refrigerators, freezers, dishwashers, clothes washers, water heaters, furnaces, boilers, Central air conditioners, room air conditioners, heat pumps, and Pool heaters.
The law requires that the labels specify; The capacity of the particular model. For refrigerators, freezers, dishwashers, clothes washers and water heaters, the estimated annual consumption of the model. For air conditioners, heat pumps, furnaces, boilers and pool heaters, the energy efficiency rating. The range of estimated annual energy consumption, or energy ratings, of comparable appliances. Some appliances also feature the Energy Star logo, which means that the appliance is significantly more energy efficient that the average comparable model. For more information on the Energy Star program, operated by the Department of Energy and the Environmental Protection Agency, visit the EnergyStar website at www.energystar.gov.
For an Energy-Smart Deal on your next appliance
· Read the Energy Guide label.
· Compare the energy use of competing models.
· Estimate their differences in energy costs
· Consider both purchase price and estimated energy use when deciding which brand and model to buy.
Sunday, August 06, 2006
What Fireplace is right for you
You’re in the market for a new fireplace, but you’re not sure whether an electric, gas, or traditional fireplace is for you.
Electric: The main benefit of electric fireplaces is their convenience. You simply pug them into any electric outlet and flip a switch to enjoy a fire. These fireplaces are ideal for those who live in a warmer climate but still want to enjoy the sight of a crackling fire. Why? Electric fireplaces can run with or without heat.
Gas: Gas fireplaces are more convenient than are wood burning models. You simply press a button to turn on your fire. Today’s models offer a truly realistic fire. You can also adjust the amount of heat they give off. And most models will operate when the homes power goes out.
Wood-Burning: These fireplaces may be the least convenient of the three. After all, you have to purchase fire logs and spend time and energy starting your fire. Clean-up and more maintenance are also involved. But there are some who won’t settle for anything less than the look, sounds, and smells of a real wood-generated fire.
Saturday, August 05, 2006
" I don't believe in Radon" So why should I have a Radon Test?
OK, I hear you. Despite the information that has been provided through such sources as:
U.S. environmental Protection Agency www.epa.gov/iaq/radon
World Health Organization
National Academy of Sciences
American Lung Association www.lungusa.org
US Department of Health and Human Services
The American Association of Radon Scientists and technologists www.aarst.org
You believe that radon is not a problem with respect to your home. If you are planning to buy a home and sell in a five year time frame, you should at least understand the following. More homes are being tested for Radon. In five years, the amount of testing will only increase. The U.S. EPA has adopted an action level of 4pCi/l as its action level. The state of Illinois has adopted the same standard. If a home, during a real estate transaction, tests over the action level, it becomes a disclosure issue. The seller has to tell any future potential buyer of the elevated Radon level. If you test the house that you are going to buy and it is over the action level, you can ask for the seller to mitigate or give you credit for the cost of mitigation. The average mitigation is about $1500.00. Also, note that about 1 out of 3 homes in the chicagoland area test over the action level.
So lets review the economics. When you buy a home the cost of a Radon Test is about $200.00 depending on the amount of monitors needed to test the home. There is a one in three chance the house will test over the action level and need mitigation. When you sell, your house will likely be tested for Radon. By then the cost of mitigation will be about $2800.00 on average. Now you have a 1 in 3 chance of spending $2800.00.
If you do not believe the science you should believe the economics of your decision. The cost of not testing will only increase over time. The cost of mitigation is too high not to test. I do urge you to go to the above resources and get the real facts.
Lastly, your home inspector cannot with a visual inspection tell you if you need to test for radon. Radon is a colorless, odorless, and tasteless gas. It is also found in all types of homes. Homes with basements, crawlspaces, and even slab on grade have all tested over the action level. Radon has been found in townhomes also. The only way to know about your radon level in the home is to test.
Keeping Your Home Safe Fireplace Safety
If your home has one or more fireplaces, special precautions can help to keep home fires burning safely.
· Protect against sparks by enclosing a fireplace’s opening with glass doors or a sturdy screen.
· Never close the flu while the fire is smoldering. Carbon monoxide could build up.
· Never use gasoline, kerosene or lighter fluid to start a fire. Burn only dry seasoned hardwood.
· Have your fireplace and chimney inspected annually. They should be properly vented and free of blockages. Have it cleaned as needed.
· Teach children to stay back from the fireplace.
· Protect the top of your chimney with a guard that keeps out birds and small animals and keeps in sparks that could ignite your roof.
· Keep flammables such as newspapers, magazines, rugs and carpeting well away from the fireplace.
· Remove holiday decorations from the fireplace and mantle before building a fire.
· Never leave a fire unattended.
· Keep a fire extinguisher handy.
Smoke detectors greatly increase the likelihood you will survive a fire. Place at least one on each floor of your home and outside each sleeping
area. Install detectors inside bedrooms for added protection. Mount detectors on the ceiling at least 4 inched away from the wall. Test detectors monthly and replace batteries once per year. Replace smoke detectors every ten years.
If caught in a fire remember fumes overcome most victims long before flames reach them. Use your safest exit. If you must escape through smoke, get down and crawl low under the smoke, keeping you head about 12-24 inches off the floor. If you have not gotten around to conducting a family fire drill, now is the time to do it. Invest in a few fire extinguishers. Extinguishers are classified as to the type of fire they will put out. You will find the classification displayed on the fire extinguisher. A Class ABC extinguisher is multi-purpose and works well against any small, self contained fire. Contact your local fire department to ask about training. If a fire does break out, take immediate action. The smoke and flames spread rapidly. Get out of the house right away
Friday, August 04, 2006
UL Warns Of Entrapment Hazard When Using Automatic Garage Doors:
Although it is often the largest and heaviest piece of moving equipment in a home, many consumers don’t realize the potentially deadly consequences associated with automatic garage doors. Underwriters Laboratories Inc. (UL) reported receiving four reports of children being trapped beneath automatic garage doors that were left in a partially opened position. When stopped in this position, activation of the door operator may result in the door initially traveling in the downward direction thus increasing pressure on someone trapped beneath the door. Continued or repeated activation of the door, particularly when in a panic state, may not result in the immediate reversal of the door to the open position, particularly if the door operator in not properly maintained.
UL recommends that automatic doors be left only in the fully open or fully closed positions and never in a partially open or closed position. Walking or crawling under a partially opened door creates a potential entrapment hazard. “Garage doors weigh as much as 600 pounds and can cause serious injury or even death if they’re not used with care,” says Barbara Guthrie, UL consumer affairs director. “Although UL listed residential garage door openers manufactured since 1993 have enhanced anti-entrapment safety features, homeowners Should not take safety for granted, “Ms. Guthrie adds. “If entrapment occurs, remain calm, and call for help from your local fire department.”
To reduce the risk of severe injury or death: Read and follow all instructions. Never let children operate or play with door controls. Keep remote control away from children. Always keep the moving door in sight and away from people, pets and objects until completely closed. No on should cross the path of a moving door.
Test the door operator monthly. The garage door must reverse on contact with a 1-1/2 inch high object ( or a piece of two-by-four lumber laid flat) on the floor. If the door doesn't stop and reverse after contact with the object, disconnect the operator and use the door manually until the operator is replaced or repaired by a qualified and trained technician.
When possible, use the emergency release only when the door is closed. Use caution when using this release with the door open. Weak or broken springs are capable of increasing the rate of door closure and increasing the risk of severe injury or death. Keep garage doors properly balanced. See owner’s manual. This information is provided by Underwriters Laboratories Incorporated.
Thursday, August 03, 2006
What are the buyers worried about?

Believe it or not. All buyers are very influenced about a house from their first look. Grandma was right. First impressions do count. One question that I always ask buyers before the home inspection is, Do you have any concerns about the house? Most of the time the first issue they are concerned about is something they saw when entering the house. The buyer makes a decision about how well the house is maintained by what they see on the outside. The house to your right is a well maintained 12 year old house. The roof has normal wear for a house of this age. Some of the potential buyers may not be able to get past the streaks on the roof. The moral of the story for the home seller is to know your home.
When selling a home it is important to elicit an objective opinion. Be prepared to answer questions about the appearance and operation of the home. Also, make a list of things you know are broken. Making these repairs before the home inspection will significantly improve the chance of a smooth sale. Keep in mind, you will not be able to repair everything and the home inspection may bring out issues you do not know about. Prioritize your repairs, if you have to choose between several repairs, lets say a broken front window and a basement closet door, repair the window. The window will be noticed and the concerns about the home will follow.
If your home is different from others in its operation let the buyers know. For instance I was recently in a home that needed a wall switch to be flipped before the dishwasher would work. The owner quickly explained that the reason is that they have small children that like to push the dishwasher button when they pass. Their solution was to wire the dishwasher to a wall switch. The children could not turn on the dishwasher. Their problem was solved. New owners would need to know this to run the dishwasher.
Finally, access your major systems in the house. If you have older systems that are working, you may want to offer a home warranty. You can offer it as a sales incentive or only offer it during final negotiation. The best home warranties cost about $425.00.
Wednesday, August 02, 2006
How to Repair Wood Rot
Rot occurs whenever water gets into cracks or penetrates a wood finish and can't dry out. Seal these cracks and maintain the finish to protect wood's beauty and integrity. Consult a pro for structural rot repairs, but you can tackle small ones yourself. Rot itself, is actually caused by fungus. These fungi spores can remain active in the wood for long periods of time and can reactivate when they get wet. It is imperative, when rod is noted, to find any source of water that may be causing this rot. After the source of water is taken away it is recommended to repair the wood rot areas as follows:
- Use a wood chisel, an electric drill with a spade bit, or another tool appropriate for the situation to remove all wet, loose and unsound wood.
- Probe the surrounding area with an awl. If it feels as solid as unaffected areas, drill numerous closely spaced holes of 1/8-inch (3-mm) diameter in the wood and inject a liquid wood hardener as directed by the manufacturer.
- Mix two-part epoxy or polyester wood filler as directed. Mix only what you can apply and shape in a few minutes. Once the material hardens--and it does so quickly--you must throw it away.
- Fill the hole or build up the affected area with the wood filler, using a putty knife or flexible plastic spreader. Press hard to work the initial layer into the surface for a good bond.
- Clean off the applicator and mixing container immediately.
- Use a rasp tool to roughly shape or level excess filler as soon as the filler sets up, but before it dries completely.
- Use medium or coarse sandpaper to further shape and blend the patch when the filler is completely dry. On flat surfaces, use a rubber sanding block or power sander. On contoured surfaces, use wood dowels or other appropriate shapes to back the sandpaper.
- Blow off the dust and apply freshly mixed filler to fill any remaining depressions or pinholes, or to build up more material as needed to attain the desired shape.
- Use medium, then fine sandpaper to smooth the patch and feather it into the surrounding wood.
- Touch up the patched area with primer and paint.
Following these steps will help in the repair of small areas of rot.
Subscribe to:
Posts (Atom)